Lists
Let's create another HTML file. Go back to your text editor, and open a new file. Type (or copy and paste) the code shown for FILE3.HTML in Appendix A.
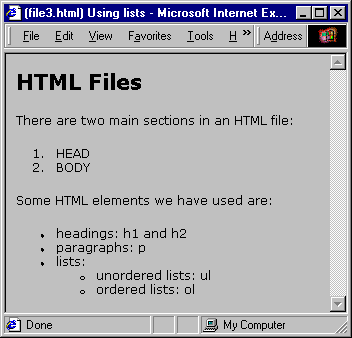
Once again, save the file. Save it in the same directory where you saved the first file, and call it "file3.html". Go to your web browser, and open this new HTML file using FILE-OPEN-BROWSE as before. If you're using a graphical browser, you should see something like this:
Figure 3: Using lists

(Appendix A, file3.html)
What have we added here?
If you compare file3.html with what your browser shows, you can see several things:
- That <ol> creates a numbered or "ordered" list.
- That <ul> creates a bulleted or "unordered" list.
- That <li> is used to indicate a new list item.
The "list item" element is one of those elements whose closing tag </li> is optional. This means that you can leave it out if you wish. I recommend using closing tags even when they are optional, as we've done in file3.html, to make it easier to read the code and to ensure that there is no ambiguity.
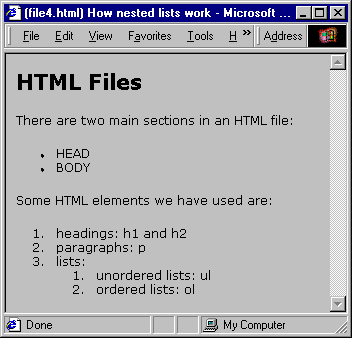
You can also see that it is possible to nest lists inside other lists (this is one instance where you do need to use closing </li> tags - some browsers may get confused by nested lists if you don't). Different browsers will use different bullet and number schemes, but all should be able to differentiate between the different nested lists in one way or another. For example, if we use the same file, but change the ordered list to an unordered list, and the unordered lists to ordered lists, we might see something like this (for the HTML code, see FILE4.HTML in Appendix A):
Figure 4: How nested lists work

(Appendix A, file4.html)
A speech browser would read this file something like this:
File 4 HTML: Using lists.
A heading entitled: "HTML Files".
There are two main sections in an HTML file:
List item: head
List item: body
Some HTML elements we have used are:
List item 1: headings: h1 and h2
List item 2: paragraphs: p
List item 3: lists:
List item 3.1: unordered lists: ul
List item 3.2: ordered lists: ol
Last item.
End of document.
Tables
There are times when a table is the best way to present a set of information. Tables can become highly complex and sophisticated in HTML, particularly when you take into account how they will be presented by a speech browser. For now, we'll stick to something simple, so that you can see clearly how the table structure works.
Again, open a new file in your text editor, and type (or copy and paste) the code from FILE5.HTML in Appendix A.
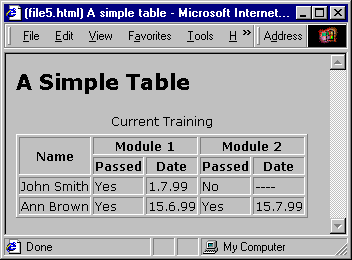
Save it as "file5.html", and open it in your browser. With a graphical browser, you should see something like this:
Figure 5: A simple table

(Appendix A, file5.html)
Let's go through the elements used to create the table:
<table border="1" summary="...">

...

</table>
Tables start with <table> and end with </table>, as you might expect. Also, here we have our first example of an "attribute": BORDER="1".
Attributes modify particular aspects of an element, and are put inside the "<" ">" brackets of the appropriate opening tag.
In this instance, the attribute BORDER determines whether or not borders will be shown around the table cells. A value of "0" indicates no border, and a value of "1" indicates that the border should be shown.
Although the BORDER attribute relates to visual presentation rather than document structure, I have included it here because it makes it easier to see how the table cells are structured.
A second attribute is also included: "SUMMARY". As you can see if you are using a graphical browser, the summary information isn't displayed. It is necessary, however, to clarify the content of the table for non-visual browsers, and would be read out by a speech browser. <caption>
...
</caption>
The "caption" element is exactly that: a caption or title for the table. This element, if used (you don't have to have a caption if it isn't necessary to understand the table) must be placed immediately after the opening <table> tag. <tr> ... </tr>
A table row starts with <tr> and ends with an optional closing </tr> tag. The only elements that can be placed between these tags are table headings and table data. <th> ... </th>
These tags indicate the start and end of a table heading. Headings would generally go along the top and down the left of a table (i.e. column headings and row headings). The closing </th> is optional.
Different browsers will show table headings in different ways: a common method in graphical browsers is to centre the heading text and make it bold. rowspan="2"
Another attribute. This can be used in table heading or table data start tags, and indicate that the table cell should span 2 rows. rowspan="5" would indicate that the cell should span 5 rows.
If you look at how the table is displayed, you can see that the table cell containing the heading "Name" does in fact span 2 rows of the table. As a result, the next row "starts" one cell in from the left. colspan="2"
An attribute similar to ROWSPAN, but COLSPAN indicates that the table cell should span the indicated number of columns in the table. Again, this attribute can be used in table heading or table data start tags.
If you look at how the table is displayed, you can see that the table cells containing the headings "Module 1" and "Module 2" each span 2 columns of the table. <td> ... </td>
These tags indicate the start and end of a table data element. The closing </td> tag is optional.
Many other HTML elements can be nested inside table data tags. It's even possible to nest tables inside each other this way.
 Hyperlinks Hyperlinks
|


