What software do you need?
HTML documents are simply text documents, so any software that can create text documents can be used, for example Notepad on PCs and Simpletext on Macs.
Getting started
Start up your chosen text editor, open a new document, and type (or copy and paste) the code shown for FILE1.HTML in Appendix A.
Now save this as a text file and call it "file1.html" (see the note below). You should probably create a new directory for the various files you will be creating as you work through this tutorial (you could call the directory "htmlwork").
Note: I refer to files being saved with the extension ".html". If you are using a PC with Windows 3.0 or 3.1, you should use the extension ".htm" instead.
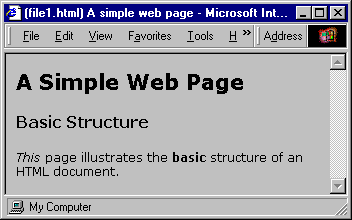
Start your web browser and when it is ready, select FILE-OPEN-BROWSE, find the file you have just created, and select and open it. If you are using a graphical browser, you should see something like this:
Figure 1: A simple web page

(Appendix A, file1.html)
The background might be white instead of grey, and the text might be displayed using a different font style or colour: these depend on your browser's preference settings. Otherwise, what you see should be broadly the same as in the illustration above.
If you were using a speech browser which reads out the content of web pages, you might hear something along the lines of:
File 1 html: A Simple Web Page.
A heading entitled: "A Simple Web Page".
A sub-heading entitled: "Basic Structure".
[with emphasis] This [normal tone] page illustrates the [strong emphasis] basic [normal tone] structure of an HTML document.
Last item.
End of document.
What we can learn from this simple file
HTML consists of instructions or "tags" enclosed in "less than" ("<") and "greater than" (">") symbols. There are two main sections to an HTML document: the HEAD and the BODY. The HEAD section generally contains information ABOUT the document. For example, the document TITLE, contained within <title> ... </title> tags. Many visual browsers will display the title in the title bar at the top of the screen.
Information about the document and its contents is referred to as META data. A whole series of META tags are available which simply provide further information about the document. Here are some of the most commonly used:
<meta name="author" content="your name here">

<meta name="description" content="a brief description of the document and its contents in your own words">

<meta name="keywords" content="a comma separated list of keywords relevant to the content of the document">
Your document will work quite happily without these. They are primarily used by the "search engines" which search and index web pages. The BODY section contains the information that is to be presented to the user. Most tags come in pairs: an opening tag (eg <head>) and its corresponding closing tag (eg </head>). Later, we'll see that for some elements, the closing tag is optional, and for a few elements, no closing tag should be used. Most elements, however, require both an opening tag and a closing tag.
Note: Even where the closing tag is optional, it is a good idea to include it anyway. It cuts down on possible problems with some browsers, and makes it easier for you or someone else to read and error check your code. Tag pairs must be "nested" correctly. For example, the TITLE is contained within the HEAD section of the document:
Wrong: <head> ... <title> ... </head> ... </title>
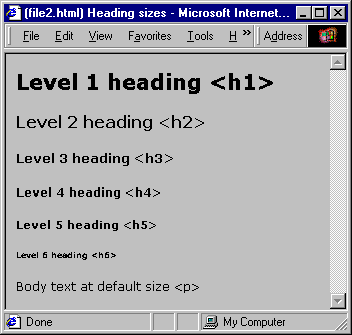
Correct: <head> ... <title> ... </title> ... </head> We created a first and a second level heading using the "elements" H1 and H2. There are 6 heading levels available: H1 to H6. In general, visual browsers will format heading text differently to body text.
Figure 2: Six heading levels

(Appendix A, file2.html)
Different browsers might render headings in a different style to what is shown here, but they should all be capable of differentiating between the different heading levels. The "body text" was indicated by the element P (for paragraph). Each of these structural parts of the document started with the start tag for the appropriate element (ie <h1>, <h2>, <p>), and ended with the closing tag for that element (ie </h1>, </h2>, </p>).
These structural elements are referred to as "block" elements, and generally can't be nested inside each other. This means that you have to close one structural element before opening another one. If you consider trying to nest a subheading inside a main heading in a Word document for instance, you can see why you're not allowed to do this. It simply doesn't make any sense. Structural emphasis can be indicated using the elements EM (for simple emphasis) and STRONG (for strong emphasis). This is indicated by visual browsers in various ways. The most common is to use italics for EM and bold for STRONG.
Elements like EM and STRONG which can be nested inside "block" elements are called "in-line" elements. A general rule in HTML is that "in-line" elements can be nested inside "block" elements, but "block" elements cannot be nested inside "in-line" elements.
 Lists & Tables Lists & Tables
|


